Wednesday 4 November 2009

No compromise extruder

I have settled on using vitreous enamel resistors embedded in an aluminium block for the heater. I think they are the easiest heater to make and likely to be the most durable. They also work fine with simple bang-bang control, whereas it would appear that the Nichrome and Kapton version requires PID.

One of the aims of my new design is to reduce the amount of molten plastic to minimise ooze. Also less molten plastic means less viscous drag. I also wanted to reduce the thermal mass (to reduce the warm up time) and completely cover the hot part with insulation to allow a fan to blow on the work-piece without cooling the nozzle.

To achieve these aims I switched to a smaller resistor (same resistance but less wattage) and mounted it horizontally rather than vertically. There is some risk that the resistor may fail but I think as long as it has good thermal contact with the aluminium block, so that its outside temperature is less than 240C, then I have a good chance it will last.

The smaller resistor also means a much smaller surface area so less heat is lost. T0 keep the molten filament path as short as possible I combined the heater and the nozzle and made it from one piece of aluminium. That also gives very good thermal coupling between the nozzle tip, the melt chamber, the heater and the thermistor.


I turned it out of a block of aluminium using my manual lathe and a four jaw chuck, but I think I could also mill it out of 12mm bar using HydraRaptor.

A feature that I have used on my previous extruders is to cover as much of the nozzle as possible with PTFE. That stops the filament sticking so that it can be wiped off reliably with a brush. It also insulates the nozzle.

My previous nozzle cap implementations have been turned from PTFE rod. The downside of that is that the working face, that has been cut and faced on the lathe, is not as smooth and slippery as the original stock.


To cover the face of this version I used a 3mm sheet of PTFE so it has the original shiny surface.


Normally PTFE is too slippery to glue so my original plan was to screw it on with some tiny countersunk screws. However, the sheet I bought was etched on the back to allow it to be glued, so I stuck it on with RTV silicone adhesive sold for gluing hinges onto glass oven doors.


To insulate the rest of the heater I milled a cover out of a slice of 25mm PTFE rod.


I normally stick items to be milled onto the back of a floor laminate off-cut using stencil mount spray. I didn't think that was going to work with a PTFE cylindrical slice that is only a little bigger than the finished item. Instead I milled a hole in a piece of 6mm acrylic sheet that was already stuck down with stencil mount. The hole was slightly smaller than the PTFE so I faced it and chamfered it on the lathe and then hammered it in.


I roughed the shape with a 1/8" end mill and then sharpened the internal corners and cut the slots for the resistor leads with a 1mm end mill. I tried to mill the whole thing with a 1mm bit but it snapped due to a build up of burr in the deep pocket. On reflection it was silly to expect to be able to mill deep pockets with a 1mm bit and of course it is much faster to rough it with a bigger bit.


I used my normal technique of taking 0.1mm depth cuts at 16mm. That allows me to mill plastic with no coolant, but I expect I could have made much deeper cuts in PTFE. It mills very nicely, probably because it is soft and has a high melting point and low friction.

I haven't done any milling for a long time so for anybody new to my blog here is my the milling set-up: -


It is simply a Minicraft drill with some very sturdy mounts. The spindle controller I made originally would need its micro replaced as the one I used has a bug in its I2C interface. Instead I just connected it to the spare high current output on my new extruder controller.

The remaining part of the extruder is the stainless steel insulator.


I made the transition zone shorter than the last one I made because I wanted all of the inside of the transition to be tapered. The aluminium sleeve carries away the heat from the cold end of the transition to an aluminium plate that forms the base of the extruder. That in turn carries the heat to the z-axis via an aluminium bracket. I used heatsink compound on the joints.

Here is a view of the bottom half of the extruder: -


And here is a cross section showing the internal details: -


So that was the plan, what could go wrong? Well everything really! The first problem was that the resistor shorted out to the aluminium block. The smaller resistor only has a thin layer of enamel over its wire. Normally I wrap aluminium foil round it to make it a tight fit. I didn't drill the hole big enough so it was a tight fit with only one layer and pushing it in abraded the enamel. The solution would be a bigger hole and more layers of foil, but I just glued it with Cerastil as a quick fix. Of course it only failed after I had fully assembled it and run some heat cycles so I had to strip it down again to fix it. Not easy once the wiring has been added.

The next problem is that it leaks. I think it is because I dropped the extruder when I was building it and bent the thin edge at the end of the stainless steel barrel. That forms the seal with the heater block, so even though I straightened it I think the seal is compromised. I keep tightening it and thinking it is fixed but after hours of operation plastic starts to appear at the bottom of the PTFE cover.

The other problem is that mostly it extrudes very well, I now do the outline at 16mm/s and the infill at 32mm/s, but sometimes the force needed to push the filament gets higher and causes the motor to skip steps, or the bracket to bend so far that the worm gear skips a tooth.

I have made several objects taking between one and two hours and it worked fine. Other times, mainly when I was making small test objects with Erik, it will completely jam. Actually it seems to jam when it is leaking badly, which implies the pressure of the molten plastic is much higher as well as the force to push the filament. The only explanation I can think of is there is an intermittent blockage of the nozzle exit. More investigation required.

Tuesday 3 November 2009

Hacking with Erik

Erik de Bruijn (RepRap evangelist) is in the UK at the moment visiting Salford and Nottingham universities to spread the word. Yesterday he came here to see HydraRaptor. We spent a very interesting afternoon and evening, swapping extruder ideas, comparing objects we had made, and doing a couple of very successful experiments.

The first was something I had been wanting to try for a long time, and that was reversing the extruder drive to stop ooze. My latest extruder (details to follow) has a much smaller melt chamber but still has significant ooze when extruding PLA. Erik is pursuing the Bowden extruder idea, which should benefit even more from reversing.

Because my machine is controlled by Python, rather than g-code, it is very easy to try out things like this. We hacked the code to instantaneously reverse for a short distance very quickly at the end of each filament run. After moving to the start of the next run it fast forwards the same distance that it reversed before resuming the normal flow rate.

I designed a simple test shape to allow the results to be compared. It is a 15mm square with four 5mm towers at each corner. I am not using Enrique's latest Skeinforge which I think would minimise the extruder moves in fresh air to just three per layer. This is with a very old version that does the four outlines and then returns to fill each of them in.


Plenty of hairy bits showing the ooze. These can be removed easily, but what is worse is the object will be missing that amount of plastic making it weaker. This can be extreme with a thin structure which is remote from other parts of the same object.

We tried reversing 1 mm at 8 times the extrusion speed to start with. That worked but was obviously more than was needed. We tried 0.25mm which was too little and settled on 0.5mm, although a lot of that is taken up by the motor bracket flexing. I need to make it stronger.

The result was no hair at all!


A very simple fix for a problem that has used a lot of my time in the last two years.

The second experiment was something Erik wanted to try. He has discovered that PLA is soluble in caustic soda, so potentially could be used as soluble support material for ABS. The question was: can we extrude ABS onto PLA and get it to stick well enough to resist warping?

We made a 5mm thick slab of PLA 20mm wide and 40mm long, 90% fill. On top of that we extruded a 30 x 10 x 20mm block of ABS with a 25% fill.


The ABS looks very glossy so I think it may have some PLA in it. Possibly we needed to flush it through for longer. The ABS block is also a bit scrappy. The reason was that the extruder was playing up. It was leaking plastic, hence the burnt bits and the stepper motor was skipping steps leaving a deficit of plastic. This extruder had never done ABS before and still has some teething problems, but it shows that ABS will bond to PLA well enough to stop it curling.

Next we extruded a block of PLA on top of the ABS.


That also bonded well. The messy bit at the join is because HydraRaptor did its normal circuit of the object that it normally does on the first layer but it was in mid air.

To see how well they were bonded we put the PLA base in a vice and attached a small g-clamp to the PLA block on top. The g-clamp was pulled with a strain gauge until the ABS came way from the base at about 8Kg. Interestingly the first layer outline of the ABS was left on the PLA. That was deposited at 215°C whereas the infill of the first layer was at 195°C. These are the values I use for depositing ABS onto a raft, so in an object layer on top of support it would be 240°C giving a stronger bond. See Erik's writeup and video here.

So PLA looks like a good candidate for supporting ABS. They bond well and PLA is very rigid to resist warping. It can be dissolved with drain cleaner but also I expect it would be easy to peel when softened in hot water.

All in all a good day's hacking.

Sunday 25 October 2009

Worm drive

I have spent a long time trying to make an extruder that is reliable, performs well and is cheap and easy to make. My last design fits most of those criteria but I have doubts about how long it will last because I am putting a lot of torque through the plastic gears of the GM17 gearbox. These doubts were heightened when a tooth snapped in a GM3 gearbox that I have been using for a long time.

I decided to make a new extruder for HydraRaptor concentrating on performance and reliability. I have tried to pull together all the results of my experiments to pick the best solution for each part of the design, regardless of cost and ease of building. The result is a "no compromise" design that has taken me a long time to make. Hopefully it will be reliable so that I can move on to exploring other things.

The design criteria for an extruder for HydraRaptor are a bit different from Darwin. The weight of the extruder is far less important because it is a moving table machine (rather than moving head). The z-axis is a big slab of aluminium so I don't need a heatsink or fan, I can just conduct the heat away.

I found that the best form of traction is a "worm pulley". Screw drive has slightly more grip on softer plastic but is far less mechanically efficient. It also has the nasty habit of making the feedstock rotate in some cases and also generates dust.

The pulley can impart in excess of 100N force on the filament before it slips, so to have the grip as the limiting factor we need a motor that can provide that amount of torque. The pulley has a radius of 6.5mm so that equates to 0.65Nm. I could do that with direct drive off a NEMA23, but even with micro stepping a single step is quite a lot of filament: 13mm × π / (200 × 8) = 0.025mm. That doesn't seem much but 0.5mm filament comes out 36 times faster than its 3mm feedstock goes in, so that is almost 1mm extruded per step. That seems way too big for accurate control to me, so some gearing is necessary.

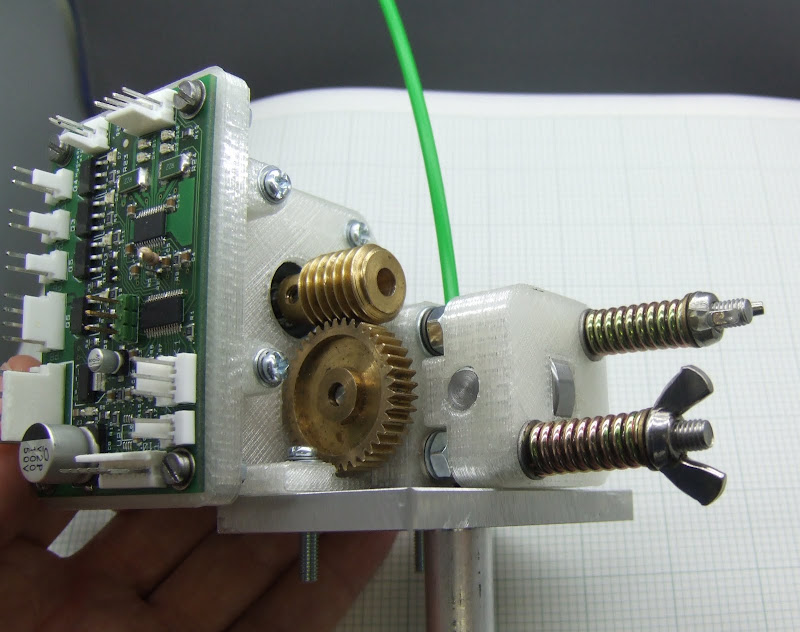
A worm gear is attractive because it gives a big reduction in one step so I came up with this arrangement: -


The pulley is on a 4mm splined shaft supported by two ball bearings. The gears are Meccano gears which are readily available. I couldn't find any other metal gears at reasonable prices. I had to drill out the worm wheel to fit the motor shaft. I filed flats on both shafts to allow the grub screws to grip.

This bearing cover holds the bearings in place and guides the filament: -


The assembly is clamped together by M5 hex head bolts that are captive in the plastic.


You can see the top of the stainless steel pipe that the filament feeds into. It has an aluminium outer sleeve to conduct the heat away from the transition section, rather than a heatsink. More on that later.

A skate bearing is used as a roller to apply pressure to the filament: -


A piece of M8 studding forms the axle. It is held in place just by friction. The bearing is centralised by cheeks on the plastic which are clear of the moving part.

The pressure is applied by springs and M5 wingnuts: -


The nuts on the bearing cover prevent the roller from meeting the drive pulley when there is no filament. That allows filament to self feed easily simply by inserting it into the hole in the top.

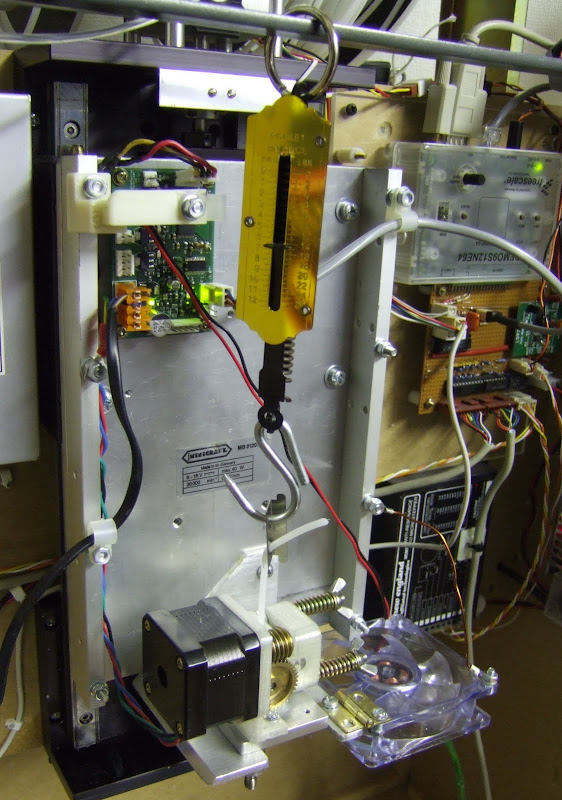
I measured the performance by attaching a spring balance to the filament and measuring the force at which the motor stalled for a given current: -


The motor is a NEMA17 rated at 0.3Nm holding torque with two coils on at 2.5A. The reduction ratio is 40:1, so I expected to only need about 0.637 / 40 to give a 100Nm pull. I was disappointed to find that I needed 1.5A to pull 10Kg.

With sinusoidal micro stepping drive the holding torque will be 0.7 times the two coil on value. I.e. 0.21Nm @ 2.5A, so 0.126Nm @ 1.5A. The torque from the pulley is only 0.016Nm assuming a reduction of 40:1, so the worm drive is only about 13% efficient if I have got my calculations right. Before I greased it, it was only half as efficient, so worm gears certainly waste a lot of effort in friction. The article here says they are between 98% and 20% for ratios 5:1 to 75:1, so I am probably in the right ball park. There will also be some friction in the bearings and pull out torque will be a bit less than holding torque, even though it is only rotating slowly.

So it reaches the target torque but with far less efficiency than my version with the tiny motor and the GM17 gearbox.

The other disappointment is that is is quite noisy, even when micro-stepping. That is simply because the z-axis couples any vibration to the wooden box behind it that then amplifies it. I
am tempted to fill it with something to dampen it down.

So this half of the extruder seems to perform, and it should be reliable because there is not much to wear out, except perhaps the worm gears, that is where most of the friction is and they are only made of brass.

I will test the bottom half of the design tomorrow.