Sunday, 30 July 2017

Adding weight

Sometimes it is desirable to make 3D printed items with heavy bases, so that they stand up or are not easily moved. An example is this base I made to hold two tiny PCBs.


They are Hall effect isolated current to voltage converters that I plan to use to measure stepper motor current waveforms in conjunction with an oscilloscope. They don't have any mounting holes, so I clamped them by the corners and screwed them onto a printed base.

I wanted the base to be heavy to stop them being dragged around by the scope leads. A while ago I saw a Youtube video by Warner Berry where he used lead shot to make printed parts with heavy bases. He prints parts with no bottom layers, so the honeycomb infill is exposed. He fills that with lead shot and then pours in epoxy resin. When that has cured he sands the base flat and sticks on a rubber sheet to make them non-slip.

I found lead shot on eBay sold for filling diving belts but I also found steel shot sold for filling teddy bears and that was much cheaper and available in smaller diameters. Steel has about 2/3 the density of lead, so it is a cheaper way of adding weight if you can accommodate 50% more volume. It also has the advantage of being non-toxic of course.

I got the smallest size, which is 1mm balls, on the basis that they will fill a space slightly better than larger sizes. The downside I found was that when pouring them they tend to bounce and fly all over the place. They don't vacuum up because they have a very high weight to air resistance ratio being spherical. I had to use a magnet to capture them. In hindsight I think 2mm balls would be easier to handle.

Instead of printing infill without bottom layers I simply made the whole base hollow. It doesn't need any infill for strength because it is going to be filled with resin. It is quite a large area to bridge without infill but it gets covered, so it doesn't matter how ugly it prints.


The screws go into brass heat fit inserts that I press in with a soldering iron. In hindsight I should have capped the holes to prevent resin getting in them.

After I filled it with the steel shot I poured in two part polyurethane resin that I had left over from an experiment nearly 10 years ago:hydraraptor.blogspot.co.uk/2008/03/hdpe-pu. I was amazed it still worked. It is probably better for this application than epoxy resin because it is less viscous, so should fill the gaps more easily.

Here it is after I sanded it down: -


Not the best casting as I under filled one corner and there are some bubbles, but it doesn't matter at all in this application.

I covered it with a sheet of adhesive backed neoprene rubber. It is probably not the best choice of rubber because it seems to be quite slippery.

The end result weighs 80g which feels quite heavy for something this size and is just about heavy enough to not be dragged around by scope leads. If I was making it again I would make it a bit deeper and try to find a better non-slip rubber.

Another way to encapsulate the shot would be to pause the print and pour them in before before the top layers are printed. They would then rattle of course, which might be annoying. On a moving bed machine like Mendel90 there would be a limit to how much weight you could add without lowering the acceleration. Also adding weight might cause the bed to drop in level slightly giving an uneven layer. Neither would be problems on HydraRaptor because its moving table weighs 9kg and has a load capacity of 125kg!

Friday, 16 June 2017

Mooshimeter Mod

Last year I bought a Mooshimeter wireless 2-channel multimeter. It is a multimeter front end that links to your mobile phone with Bluetooth and displays the results in an app.


It is handy because you can read it remotely, it can measure voltage and current simultaneously and display power, it can log to an SD card and graph the results. It can also speak the results.

Despite all these good features my "go to" multimeter is still my EEVBlog branded Brymen BM235. So my Mooshimeter sits in a drawer for most of its life. When I get it out it usually wants to do a firmware update, which needs fresh batteries. Because it has no off switch the best you can do is put it into shipping mode. It still flashes its LED occasionally, so the batteries run down over a period of several months and are then not up to doing a firmware update.

Devices with no proper off switch are a pain if you only use them rarely because the batteries are always flat when you come to use them. This is particularly a problem because modern Duracell batteries seem to leak and corrode as soon as they are flat. This didn't used to be the case. I found some very old ones that I had abandoned in outdoor devices that I expected to be corroded to hell but in fact they were not corroded at all, despite being well past their use by date. In contrast I have had many corrode recently that were flat, but still well within their use by date. I have stopped buying Duracell and now use Costco's own Kirkland branded ones. It is too early to say if they corrode or not.

So I normally remove the batteries from devices I use rarely but with the Mooshimeter this involves removing the casing that is held together by two screws. I decided to add a switch to it but it has a cat III safety rating and cutting a hole in the case would void that.

I had two ideas to get around this: the first was to put a normally closed reed switch in series with the batteries and 3D print a cradle with a magnet in it to turn it off. My second idea was to use a mercury tilt switch to turn it off when placed upside down. I ordered both but as the mercury switches arrived first I implemented that and it works well.


I decided the easiest point to break the battery circuit was the link between the two cells. For some odd reason that is a copper fill rather than just a track. It is on the top side of the PCB so I had to desolder one of the contacts to get at it.  Fortunately the battery contacts have thermal relief connections so I just cut two of those to isolate the pad.


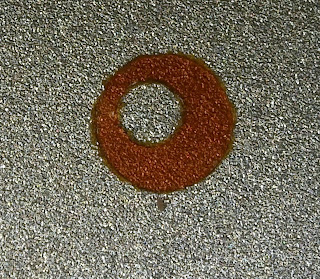
I then made an insulating washer out of Kapton film. I used that because it is very thin and can handle soldering temperatures. I stamped it out with a hole punch but I found it very difficult to get the hole concentric. This is my third attempt that was just good enough:


And here it is in place:


I reinserted the clip over the top and resoldered it. I then soldered the tilt switch between the two now isolated battery terminals.


When upright the contacts are bridged by the mercury, which is very low resistance. When I turn it upside down the mercury flows to the top of the bulb and isolates the batteries.

So all I have to do is remember to place it upside down in its case. If you want to attach the meter to something moving then the reed switch idea is the one to go for. I think it can probably be mounted in the same place if you use a neodymium magnet. You can get it nearer the back of the case by mounting it on the other side of the PCB but I don't know if that affects clearance distances for class III.

Sunday, 3 April 2016

Beware fake wire!

I bought some test leads with banana plugs and alligator clips for £0.99 on Ebay from Hong Kong. They were described as "Alligator Probe Test Leads Clip Pin to Banana Plug Cable for Digital Multimeter GF". I don't know what the GF means.


Very cheap and what could possibly be wrong with them? Well actually, almost everything!

The first time I used them to connect a regulator to a bench PSU they got hot and dropped several volts. Without needing to do any sums with wire gauge and current I felt the resistance must be too high, so I measured it to be about 1.4Ω for the round trip. Way too high as multimeter leads are generally about 0.2Ω.

I unscrewed a plug and found this: -


The screw bites down on the soft insulation and that presses the folded back strands against the barrel. Not the best way to make a connection as you want the screw biting down directly on the strands, or better still a ferrule.

At the clip end it was more of the same: -


The strands are trapped between metal and plastic again instead of being soldered through the hole. The crimp is there just for mechanical strain relief, not the electrical connection.

I removed all the connectors (the clips pull off really easily due to not being soldered) and measured the resistance of the wire on its own. Still 1.4Ω, too much I felt for that gauge of copper wire 2m long. The simple explanation is that it isn't copper.


The fact it sticks really well to magnets leads me to believe it is copper plated steel. That might be OK for measuring voltage but no good for measuring or carrying current. I can't see any reason for using it other than it must be cheaper.

I replaced it with 32/0.2mm copper wire half the length and got a total resistance of 20mΩ. Much more suitable for hooking up PSU test circuits but a bit less flexible than ideal for multimeter leads.

So basically I got usable connectors for £0.99, which is still probably cheaper than I could buy them for in the UK. The wire and the construction were junk.