Wednesday, 26 December 2007

Warped

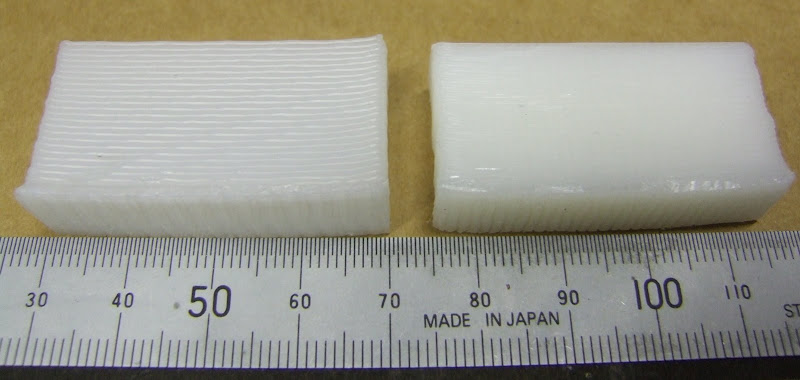
Having got an idea of the HDPE warping for thin walled open boxes, I decided to start investigating solid shapes. I made a solid block 40 x 10 x 20mm to compare with the open boxes of the same dimensions.


Obviously there are many ways to fill the interior so I started with the simplest, just alternate layers of horizontal and vertical zigzags. HydraRaptor seems quite happy extruding 0.5mm diameter filament at 16 mm / second. If extruded into free air it would actually be 1mm at 4mm/s, but that is too course, so I move the head at 16mm/s which stretches it.

From trial and error I have found that a good layer height to use is 0.8 times the notional filament diameter. If it is more, then as the lower layers shrink, the nozzle rises faster than the object and a gap develops. Once that happens the filament squirms about and does not follow the path of the nozzle accurately.

So the extruded filament is constrained to 0.4mm high. Measurements show the width to be about 0.6mm. Incidentally, if it squashed to a perfect ellipse with a height of 0.4mm then it would be 0.625mm wide to have the same area as a 0.5mm circle. I extrude the zigzag with a pitch of 0.6mm so that adjacent filaments touch, but it means the object is not actually completely solid. The space occupied by each filament is a rectangular channel 0.4 x 0.6 = 0.24mm² but the cross sectional area of the plastic is π x 0.25² = 0.20mm², so about 18% is air. I confirmed this by weighing the block. It weighs 6.5g but if it was solid HDPE then 8ml would weight about 8g. It takes about 45 minutes to make the object including laying a raft.

Before I tried it, I always imagined the amount of plastic deposited would have to exactly match the volume of the extruded object otherwise it would sag or bulge. I could never understand how FDM worked reliably. Now I know that the volume can be a bit less and the difference is made up by air. That means the amount of plastic deposited is actually not that critical, which is why RepRap can get away with an open loop extruder.

I measured the warping with the three nail jig that I showed in the last post. The thin walled box is warped 0.44mm and the solid box has warped 0.87mm so that answers the question whether solid objects warp more or less. Note that the thin walled box is made with 1mm filament because 0.5mm filament is too thin to be self supporting.

I expect I can make a less warped block by extruding a thick base and then a less dense infill above that. Something else to try.

It is amazing how strong 10mm thick HDPE is. You don't often get to see plastics in that form. Most end products have optimised strength against cost by having thin walls and ribs etc.

Sunday, 16 December 2007

Chopping up chopping boards

Up until now I have been extruding HDPE onto foam board because it was the only thing that it sticks to well enough. However, it has a couple of failings: It is not strong enough to completely resist the warping caused by the HDPE and it is not reusable because the surface gets ripped off.

I have tried many other surfaces including various woods and metals (with and without primer), melamine and several other types of foam board but nothing worked. Obviously HDPE sticks to HDPE so I decided to investigate that further.

My first idea was to use a thin sheet of HDPE cut from a milk bottle. This makes a nice surface to extrude onto but the problem is holding it down. I first stuck it down with double sided tape but the heat melts the glue. Sticking it to a sheet of aluminium to take the heat away improved matters and I was able to get slightly less warping than with foam board.


To compare the warping on different base materials I made a test shape that is a 40mm x 10mm x 20mm open box with 1mm walls and measured how much the corners lift using a simple jig.


With foam board I was getting 0.83mm lift between corners and the middle. With HDPE stuck to aluminium I got 0.76mm. Not much better because the glue of the sticky tape stretches under the curling force.

I needed a thick HDPE base and I had heard that plastic kitchen chopping boards are made from HDPE. I bought a new one from ASDA which looks like this :-


It is 5mm thick, opaque and quite rigid. I realised it was very different from the other chopping boards we have which I think came from IKEA.


These are 10mm thick and made from a softer, more translucent plastic. To find out which was HDPE I used the flow chart on this website www.texloc.com/ztextonly/clplasticid.htm. I concluded the thin hard one from ASDA is HDPE and the thicker softer one from IKEA is PP. HDPE seems to stick equally well to both of them but the HDPE one warped a bit when it was only held down with masking tape, so I decided to go with the PP one. I cut it up and bolted it down to my XY-table. It was a bit curved due to years of dishwasher use but bolting it down pulled it flat.


Surprisingly, if I lay down a raft at 200°C it sticks well but can be easily prized off again with a penknife. The board is marked slightly but it can be reused over and over again.


I extrude the object at 240°C so that it welds to the raft and itself, and I turn the fan on after the first layer so that the object cools to room temp as fast as possible.

The board is strong enough to hold the object completely flat while it is attached but when it is removed it does still curl a bit. I measured 0.44mm on my jig so that is about half the curling I was getting with foam board. Other than extruding onto a convex surface, I think that is the best that can be achieved for that shape with HDPE at room temperature. Here are the three tests side by side :-


Next I will look at different solid shapes to see if they warp more or less.

Tuesday, 13 November 2007

Disaster recovery

I am pleased to say HydraRaptor is now back up and running after my accident where I connected 240V to a 3.3V logic input. I had to replace most of the electronics, which is annoying because I originally made it out of things I already had, so it cost me nothing, but replacement parts cost me around £180 and obtaining them set me back three weeks.

Things that were destroyed:
  • My ADSL router: a friend kindly gave me a replacement.

  • My PC's serial port: I replaced it with a USB to serial adapter.

  • The Freescale DEMO9S12NE64 evaluation board that I used for my axis controller: next day delivery from Farnell.

  • The EZ430-T2012 eval board that I used for the extruder controller, fortunately the spindle controller was not connected at the time so that survived.

  • The ULN2803 and 7407 chips on my interface board.

  • The optical shaft encoder chip on my extruder.

  • The NEAT MDM7 stepper driver on the X axis. The only thing wrong with it was the direction input was not working. They are opto coupled so it should have been just a simple matter of replacing the opto, but the whole thing is potted in epoxy resin so it is impossible to fix. I managed to find a replacement on the web and I have got some spares on the way as well.

Things that survived:
  • Both power supplies and all the local voltage regulators.

  • The Y axis stepper driver.
  • The X-Y table shaft encoders and Hall effect limit switches.

  • The protected MOSFETs on the extruder controller.

I spent the time waiting for the stepper controller to arrive from the US improving my firmware. I fixed a long standing issue with timing: I was doing my Ethernet comms under interrupt and the stepper motor timing with a higher priority timer interrupt. Unfortunately, the 9S12 does not have nested interrupts, so the interrupt priority is pretty meaningless. I fixed it by moving my comms to the foreground as the machine has nothing else to do in the foreground but process commands coming from the network so there was no point in doing it with interrupts.

I also added acceleration and deceleration to my stepper driving software. I am aiming to lay down 0.25mm filament at 64mm/s. My XY table can easily move that fast but I didn't like the thump I was getting when it started and stopped. It's a bit much to ask it to accelerate a few kilograms to 64mm/s instantly! The datagram for the goto_xyz command now includes a table of delays to use for the first and last n steps. It remains to be seen how much distortion I will get from not moving at constant velocity. At the very least the acceleration will be useful in speeding up the moves when it is not extruding.