I am in the process of making a heated vacuum table to hopefully allow automatic ejection of finished objects. In a conversation with Laszlo he mentioned he was planning to use a heated steel bed and use magnets placed around the object to hold down a sheet of Kapton. I turned the idea upside down. Why not stick Kapton tape to a sheet of steel and clamp it to a heated aluminium bed using magnets underneath?
I found a thin sheet of bright springy steel that was part of an electric toaster. My best guess is that it is one of the grades of stainless steel that is magnetic. It is only 0.3mm thick so it is relatively flexible, but it always springs flat. It came from a Kenwood toaster that gave good service until our cleaner suggested to my wife that she should turn it upside down to get rid of some persistent crumbs. The next time it was used it burst into flames because a crumb got wedged between the element and the steel plate and burnt through the nichrome.
I made a tiny heated table from an off-cut of 6mm aluminium. It is only 105mm x 73mm, which is smaller than a MakerBot CupCake bed but I think it is just big enough to make all the Mendel parts.
I have run out of AL clad resistors so I made my own from vitreous enamel ones embedded in aluminium blocks with tin foil. I used two 6.8Ω resistors in series driven from ~ 26V AC. That gives about 50W and a similar warm up time to my larger bed driven with 200W.
I milled flat bottomed holes to within about 1mm of the surface and embedded five neodymium magnets which are held in with Kapton tape.
I used M3 threaded nylon stand-offs as insulated table legs and mounted it onto my XY-table using a sheet of 4mm aluminium / plastic laminate called Dibond. It is very nice material to work with.
The steel plate covered in Kapton tape then sticks to the top of the table. I heated it to 100°C and tried making some ABS objects.
This worked well and the objects were easy to remove by bending the plate and peeling them.
The magnets are strong enough to hold down even big objects. The only problem I had was that the nozzle snagged on the first layer of this object and managed to slide the steel plate, causing the first layer to be offset.
Contrary to popular belief, FFF does require significant force and benefits from a stiff extruder mounting.
A couple of pins in the corners to act as dowels would solve the sliding problem.
Here is a video showing how easy it is to remove the objects: -
It is still a manual process though, so I will pursue the vacuum table idea to attempt to make a bed that can eject the object itself.
Sunday, 31 January 2010
Saturday, 23 January 2010
Will it stick?
ABS sticks very well to hot Kapton, so I wondered what else would stick to it. The first thing to try was PLA. This sticks pretty well to cold masking tape and doesn't warp much, but large objects do have some warping. I figured heating the bed to around 50°C would fix that. Rather than changing from Kapton to masking tape I decided to see if I could stick PLA to Kapton and get a shiny surface as well.
The first bracket was made on cold masking tape so the base has a matt finish.
The second one is on Kapton at 50°C for the first layer, dropping to 40°C after that. My logic was to have the bed just above the glass transition to make it stick and just below afterwards to stop it warping. As you can see one of the hole outlines did not stick properly. The PLA was extruded at 200°C for the first layer and 180°C for the rest.
For the third one the bed was at 55°C falling to 45°C. The outline stuck properly and the base is nice and shiny. The surface imperfections you can see are from gouges in the aluminium bed caused by a slight accident with a decimal point. It caused the nozzle to be rammed into the bed and then the X-Y movement ploughed furrows. These show up through the Kapton tape.
The last one is my first ABS test for comparison.
It was looking good, so I tried something bigger, a Mendel belt splitter jig: -
The left hand corner lifted and the object ended up more warped than it would have been made on cold masking tape.
I tried again with the bed at 55°C all the way through the build. My extruder started jamming so I increased the PLA temperature to 210°C for the first layer and 190°C for the rest, the values I had been previously using on cold tape.
This time it was successful and stayed stuck down: -
The base came out perfectly flat and more transparent: -
The extrusion lines of the three solid base layers are less visible and you can see through to the sparse infill. This is only 25% but the object feels incredibly strong. I get the feeling the hot bed makes things stronger.
There is a bit of a meniscus around the edge. This is mainly because I had a bodge of a -0.1mm offset in the first layer outline to get PLA outlines to stick to tape reliably. I removed the bodge and made this object: -
The base layers are very transparent here, even more so to the naked eye than the camera shows. There is something a little odd with some of the extrusion lanes above the bottom left hole. I think those discontinuities must be the plastic squirming a bit while extruded, which is usually a sign of not being stretched enough.
The top of the object has a small defect: -
There is a small hole above and right a bit of the centre. I think this is because the plastic doesn't span gaps as well without a fan, so it fails to bridge the sparse infill properly. I wasn't watching so I didn't see exactly what went wrong.
The next plastic I tried was HDPE. Not surprisingly it doesn't stick very well to hot Kapton. With the bed at 130°C it stays molten but is quite rubber like. With the bed at 110°C it sets and turns white (because it crystallises I believe). I tried various combinations of these two temperatures but could not get it to stick reliably. I could lay down the first layer of a raft but then subsequent layers would rip it up as the adhesion is very low.
I think the way to do HDPE without a raft is to extrude it onto a thin sheet of HDPE, or maybe polythene, held down by a vacuum and heated to prevent warping. That will have to wait until I build a little vacuum table, hopefully this weekend.
Last on the list was PCL. That sticks very well to Kapton heated to 40°C but it never sets and makes a soggy object.
Before the heated bed I used to build with a fan, and at only 40°C the bed has no trouble holding temperature, so I tried with the fan next.
That worked OK and built a complete object: -
The infill did not stick very well to the outlines of the holes, especially on the downwind side. It probably needs a denser infill, and perhaps some overlap. 25% fill is not really appropriate for PCL as it very soft and flexible.
The bottom is smooth and shiny as expected and it took some effort to peel it off, so I expect large objects could be made. I couldn't experiment further though because the filament started buckling in my extruder.
I can't explain why it worked for a while and then stopped but I tried higher temperature and slower extrusion but could not get it reliable again. The pipe could probably be a few mm closer to the pulley but not much more because it would hit the pinch wheel.
I don't have a lot of use for PCL, other than using it up. Dropping it from the requirements for the extruder would allow me to use a smaller pulley. If you look at the table at the end of this article, you can see that it is only PCL that struggles for grip with a worm pulley. I think I could drop to half the diameter, which would just about bring the gear ratio into the range of a single pair of spur gears. I have a 4" Meccano gear that gives 7:1, so I might try that in my next extruder.
So hot Kapton works well for everything I have tried so far apart from HDPE.
Monday, 11 January 2010
Stepping up to the mark
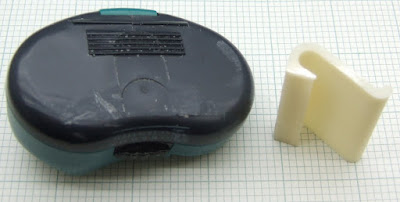
My wife is a very measured person. As well as watching how much power we using she likes to count her footsteps with a pedometer to check if she is getting here daily quota of 10,000. I have bought her several pedometers but they generally come to an early demise due ti inadequate belt clips. The last one fell into the toilet! The first one I bought was the best, but the belt clip broke off.
I promised to RepRap a new clip a long time ago, but only got round to it today. Neither of us could remember what the old clip looked like so I designed a simple one from scratch. To my surprise it printed perfectly on the hot bed, I thought it might need some cooling. HydraRaptor will have automatically dropped to half speed because the layers are so small.
I cut off the remains of the old clip and filed it smooth. I then removed all traces of grease with some isopropanol and welded it on with some MEK pipe cement. A friend gave me it anticipating that I might want to weld ABS someday. It will dissolve and weld ABS and PVC. I think the case is ABS, so it is ideal for the job. It needs 4 hours to cure, so I left it overnight.
It seems to have done the job. I offered to make it in black but my wife wasn't bothered.
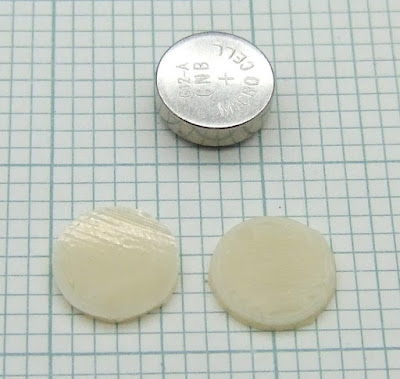
The next problem was that the batteries had gone flat in the years she has been waiting for me to fix it. Buying specific batteries is expensive but you can get a mixed selection of 40 for £1. The problem is though that we mainly use the biggest ones so have too many of the smaller ones. I had some that were the right diameter but too thin so I Reprapped some spacers.
I can now make objects side by side one layer at a time with no strings between them. These are probably the smallest things I have made. They are about the size of tiddlywinks.
A bit tricky to keep in place while the battery cover is replaced but they did the job.
So I am back in the good books for a while. I managed to run off two of these as well. They take about 90 minutes each and are perfectly flat and string-less again.
Just the odd lump on the surface at the start or end of an outline. I think that can be easily solved by always starting on an inner shell before doing the outer shell and then finishing the outer shell with a wipe towards the inner one.
Subscribe to:
Posts (Atom)