I have made a clamping system to fasten PCB material to my XY table. The test using masking tape worked surprisingly well but I need to be able to turn the board over whilst maintaining alignment for double sided PCBs.
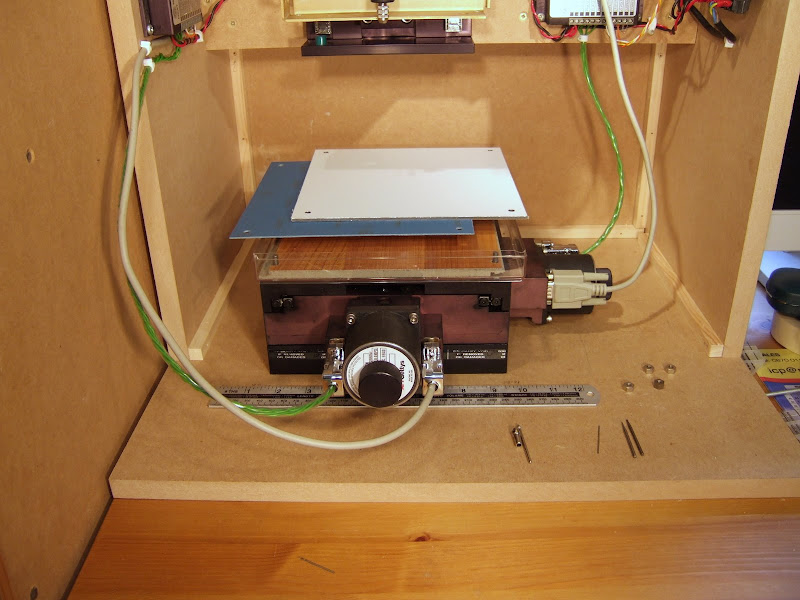
The bottom layer you can see in the picture is a plastic tray to catch the dust from milling. It is the bottom half of a Ferrero Roche chocolate box. They make great boxes but unfortunately my wife does not rate the chocolates much.
The next layer is a sacrificial piece of laminate flooring to support the PCB and prevent breakout when it is being drilled. It seems a shame to cut it up and use it this way but at £6 per square meter this piece only cost £0.17 and I can use both sides at least once.
The blue sheet is single sided PCB material. I will use the machine to route a square aperture in the middle of this at the limits of the XY table's travel. The PCB being made will rest against one corner of the aperture to locate it. Being double sided it will stand proud by 0.3mm due to the extra layer of copper.
The top layer is a 3 mm aluminium and plastic laminate that I will use to clamp the board down on two edges. I will use the machine to route a slightly smaller aperture in it than the layer below so that it overlaps slightly. The other two edges of the board will be held down with masking tape.
The whole lot is clamped by four 2 BA nuts on threaded rods that fit holes in the XY table. My XY table is imperial and the rest of the machine metric!
I am currently working on the firmware. I have replaced the test code I cobbled together just to try things out with an interrupt driven 3D Bresenham line drawing routine. Although I probably will never need to step Z at the same time as X and Y it was easier to code the general case. It makes some interesting sounds when in runs because the motors play a three note chord depending on the gradient of the line.
The code is written in C in an object oriented style even though C is not an OO langauge. I always tend to code like that and have done so since before I knew what OO was. The three axes are represented by structs that store the position, etc, along with function pointers for stepping and reading limits which is axis dependent. That way I can reuse the same Bresenham and homing code for all three axis.
typedef struct axis {
    sword   pos;                        // Current position
    sword   min;                        // Limits
    sword   max;
    sword   steps;                      // Number of steps to do this line
    sword   dir;                        // Direction of each step +/-1
    sword   acc;                        // Brezenham accumulator
    void    (*set_dir)(bool);           // Virtual function to set direction output (X,Y only)
    void    (*start_step)(void);        // Leading edge of step pulse
    void    (*end_step)(void);          // Trailing edge of step pulse
    bool    (*mlimit)(void);            // Read the negative limit
} axis_ty;


No comments:
Post a Comment