Monday, 4 April 2011

Auto z-probe

A niggling problem I have with Hydraraptor is that the z-axis calibration varies with the weather and how much it is used. This is because the frame is made from wood, which absorbs atmospheric moisture and expands. When the machine is running constantly the heat from the bed dries it out and it plateaus at a low z-value. If I don't use it for a while the z-axis gets higher by as much as 0.5mm in wet weather and the first few builds need large adjustments. When printing raft-less the initial layer height needs to be accurate to about 0.05mm for 0.3mm layers.

When it was configured as a milling machine I made a tool height sensor to solve the problem. It doesn't work for FFF though because the nozzle usually has hot plastic dribbling from it and it also wastes some of the build area.

To solve the problem I designed a z-probe that hangs below the nozzle at the start of the build but then retracts itself after the measurement. It consists of a weighted metal rod that slides through a couple of plastic guides. It has a plastic flange on the top that depresses the plunger of a light action micro switch. In measurement mode the rod protrudes about 10mm below the nozzle. When the measurement is completed the axis descends to place the nozzle close to the bed. The rod lifts until the attractive force of two Neodymium magnets causes it to be pulled about 5mm above the nozzle and held there until the start of the next build.


Here it is installed on the axis.


I used a Meccano worm gear as an improvised weight to ensure the micro switch is activated, much cheaper options exist! The actual weight is surprisingly not very critical. It must be enough to activate the switch reliably but not too heavy for the magnets to lift.


The operating procedure is as follows: The machine warms up the bed and the extruder and waits for a couple of minutes for the nylon pillars that support the bed to expand fully. It then extrudes a length of filament with the z-axis at the top and gives an audio prompt on my computer. I grab the filament and snap it off and then lower the z-probe, which closes the switch and instructs the machine to start.

The axis descends rapidly to place the rod 1mm above the centre of the bed. It then descends in 0.1mm steps until the switch opens. Then it ascends in 0.01mm steps until the switch closes again and that gives the Z calibration point, which is a known distance (about 10mm) above the bed. The nozzle then descends to 1mm above the bed to retract the probe before it moves to the start point.

Here is a video of the sequence.


It could also lower the probe automatically simply by having a bracket near the top of the z-axis to catch the flange as the axis rises past it. The reason I don't do that at the moment is because I use the act of manually lowering the probe as a cue to the machine that I have removed the start extrusion.

The design is on Thingiverse.

Sunday, 13 March 2011

Spot on flow rate

I have been doing some fine tuning of flow rate recently. I had previously noticed that PLA appears to need a slightly lower flow flow rate than ABS. I didn't notice this with HydraRaptor but I did when I changed from PLA to ABS on my Mendel, which has a Wade's extruder. My theory was that PLA feeds faster than ABS for the same rotational speed of the pinch wheel because, being much harder, it sits on the crests of the teeth and hence is driven by a larger effective pinch wheel diameter than ABS, which sinks in further. This effect is more extreme with a smaller pinch wheel. HydraRaptor has a 13mm pinch wheel compared to just 5mm for the hobbed bolt in my Wade's.

Other people have claimed that ABS changes density when it is extruded. I didn't believe that so I did an experiment to investigate.

I programmed HydraRaptor to extrude 100mm of ABS. I put a mark on the feedstock about 120mm away from the top of the extruder and measured how far the mark moved. I also measured the length and diameter of the extruded filament and I also weighed it and a 100mm sample of the feedstock. These are the results: -
Filament input to the extruder: 105mm of 2.98mm ABS equals 732mm3, weighs 0.777g, density 1.06 g/cm3.
Filament extruded: 2.89m at 0.56mm diameter equals 712mm3, weighed 0.764g, density 1.07 g/cm3.
So on the face of it the volume has gone down by 3% and the weight by 2% giving a slight increase in density. This could be explained by some volatile compounds boiling off, which they do, but I think it is mainly measurement error. In particular the diameter measurements have a big effect because of the square law for area. I took four measurements and averaged them but that is not many along 3m of extruded filament. Also the electronic scale I used to weigh the filament does not have a very stable display as it is only a cheap instrument. It is certainly a lot less than the 15% I have seen reported though.

I also extruded "100mm" of PLA and that actually fed 110mm, showing that with a 13mm pinch wheel it feeds about 5% faster. With a 5mm hobbed bolt I would expect that to be about 12%, which starts to become very noticeable.

So I corrected the pinch wheel diameter in my software for the correct value for ABS and added a bodge factor for PLA. That left the flow rate a bit too low as it has previously been producing good looking objects with the overfeed, so I reviewed the maths I was using.

I have always extruded filament with a 1.5:1 width over height ratio and use a flow rate that would fill a circle 1.25 times the layer height. That was because I originally observed that you need to squash the filament to 0.8 times its diameter to get a good bond and that makes the width about 1.5 times the height. However, that only gives a packing density of 82%, which is a bit low. If you increase the flow rate so the infill is 100% then the outlines will be too wide. This is because the infill can occupy the full rectangular cross section of the filament road, but the outline, being unconstrained, will not have straight sides, so will be wider.

I reasoned that the outline will be extruded with a flat top and bottom where it is constrained between the nozzle and the bed but the sides will most likely be semicircular due to surface tension effects. This led me to a formula that gives the width from the notional extrudate diameter and the layer height.


Equating the two areas gives πd⁄ 4 = πh⁄ 4 + h (w - h). So w = h + π(d⁄ h - h) ⁄ 4 allowing the width to be predicted from the layer height and the flow rate.

Calling the aspect ratio a = w ⁄ h and re-arranging to get the flow rate to make the desired width gives: d = h√(1+ 4(a - 1) ⁄ π). For an aspect ratio of 1.5 d = 1.28h. I had previously been using 1.25h which is about 5% too low but was compensated for by the pinch wheel overfeed. I made a single walled box with the corrected pinch wheel diameter and the new formula and verified that the walls were 1.5 times the layer height.

I also used the same flow rate for the infill, but that can be increased up to the full area of the rectangle w×h. Because the outline and infill use different flow rates there is a small deficit of plastic where they meet, as this model shows: -


This can be fixed by using the infill perimeter overlap ratio setting in Skienforge, but how much? The deficit in area is a rectangle h  ⁄ 2 × h minus a semicircle of diameter h, i.e. h⁄ 2- πh⁄ 8. If the infill overlaps by a distance x then it contributes an area x × h. Equating these gives x = h (0.5 -π/8).

Converting to a ratio of w gives x/w = (0.5 -π / 8) / a. For a = 1.5 that gives an overlap of 0.07 leading to a "fully stuffed" model where the solid layers are 100% plastic.


In practice that leaves no room for error and requires the nozzle to force the plastic into the corners of the rectangular channels like an injection molding machine. I found I get a better looking object with the volume reduced to 90% of that value. So for the infill I use the formula d = h√(0.9 × 4a  ⁄ π) giving d = 1.31h for a = 1.5, making the optimum flow rate for the infill about 5% more than the outline. I also use an overlap value of 0.05 giving the theoretical packing arrangement below.


Running the new equations on my Mendel certainly produces nice looking objects:


At least four people I have sold parts to have commented they look as good or better than parts they have seen from a commercial machine. I use filament about twice the diameter that commercial machines use, which results in more visible layers and rounded corners, etc, but apart from that I must be close now.

Saturday, 5 February 2011

Polyholes

When Reprap machines print holes they tend to come out undersized, even if the linear dimensions of an object are spot on. There are several effects that all make holes smaller than they should be: -

Faceting error
When CAD systems convert cylinders to triangles they produce a polygonal prism, so holes represented in an STL file are polygons with their vertices on the circumference of the original circle. That means the sides of the polygon are inside the circle, shrinking it by cos(π / n).
You need 10 vertices to reduce the error to 5% and 22 for 1%. So this error quickly becomes small as n increases but that creates another error:-

Segment pausing
When a circle is broken into a lot of little segments the start up time for a segment becomes significant. Reprap in the past has suffered from this really badly and I am unsure what the current status is. Slow serial comms and complex floating point firmware add pauses where extra filament can ooze from the nozzle.

I have never suffered from pausing because I use a 100Mbit Ethernet connection, which has a very low latency, and the data is transmitted in binary and in the units my firmware works in. This means that no further processing is required other than calculating which of the three axes has to go the furthest. However, I use trapezoidal acceleration on each segment, so for very short segments the average speed will be a little lower.

Arc shrinkage
When a flat strip of filament is bent into an arc there is too much plastic on the inside of the curve and too little on the outside. That makes both the inside and outside edges a smaller diameter than they should be. Adrian calculated a formula for it here: http://reprap.org/wiki/ArcCompensation. The formula comes out with a figure that is too small though. I think there is a secondary effect:

Corner cutting
When filament is dragged round a corner it likes to take a short-cut. This depends on how elastic the filament is and how much it is being stretched. I think when the nozzle moves in a circle the filament is continually trying to cut the corner and ends up forming a smaller diameter circle. I think this is the dominant effect on my machines.

Obviously, if you lie to Skeinforge about how wide your filament is that will make holes even smaller, but that is just a calibration problem.

Ideally all these effects should be compensated for in the slicing software but what has happened instead recently is that people are using parametric values in OpenScad to tweak the holes to come out right on their machines. That is the wrong approach because when the holes comes out smaller than they should be, without the slicing software compensating for it, then the infill doesn't meet it as tightly as it should do.

When I started printing Prusa Mendel parts I found the values in the configuration file far too big. I have also noticed this when downloading some designs from Thingiverse. That implies that my holes shrink less than a lot of other peoples, which is odd because all the effects above don't depend on the machine, apart from segment  pausing.

Some of the holes in Josef's parts are octagonal. That made me realise that polygons with low vertex counts don't shrink. The inside of the hole is defined by straight lines and they get extruded in the correct place. What does happen though is that the corners of the polygon are rounded. As long as the polygon has a small number of vertices, the corners are far enough from the circle that they can be rounded without impinging on it. The ideal number of vertices is when the corner cutting just meets the circle.

I decided to investigate this using OpenScad. I made a script that generates holes from 1 to 10mm with vertex counts from 3 to 8, 10, 16 and 32. The diameter of the holes is increased to make the polygon edges tangential to the circular hole. I.e. removing the faceting error by dividing by cos(π / n).

difference() {
    cube(size = [95,125,3]);
    for(i = [1:9]) {
        assign(v=[3,4,5,6,7,8,10,16,32][i - 1]) {
     assign(shrink =  cos (180 / v)) {
                echo(v,shrink);
                for(d = [1:9]) {
                    translate([d * d + 5 - ((v == 3) ? 3 : 0), 13 * i, 0]) 
                         cylinder(h= 20, r = (d/2)/shrink, $fn= v);
                }
            }
        }
    }
}


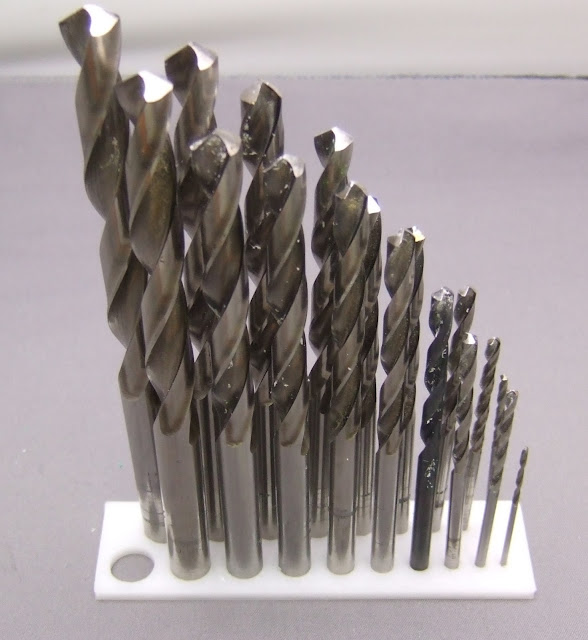
I printed the resulting shape on HydraRaptor and used drill shanks to gauge the hole sizes. Not terribly accurate as the shanks tend to be a little smaller than the tip. I inserted the drills in the highest vertex count hole that it would fit in.


A pattern emerged that the seemed to indicate the maximum number of vertices you can have before the hole shrinks is twice the hole size in mm. The only drill I couldn't fit was the 1mm drill because you can't have a polygon with only two sides. The "1mm" triangular hole did at least leave a hole though, whereas higher polygon counts fill in completely.

To test this simple rule I made a new shape with holes from 1mm to 10.5mm in 0.5mm steps with the number of vertices set to twice the diameter and the diameter increased by cos(π / n).

module polyhole(h, d) {
    n = max(round(2 * d),3);
    rotate([0,0,180])
        cylinder(h = h, r = (d / 2) / cos (180 / n), $fn = n);
}


difference() {
 cube(size = [100,27,3]);
    union() {
     for(i = [1:10]) {
            translate([(i * i + i)/2 + 3 * i , 8,-1])
                polyhole(h = 5, d = i);
                
            assign(d = i + 0.5)
                translate([(d * d + d)/2 + 3 * d, 19,-1])
                    polyhole(h = 5, d = d);
     }
    }
}


I found that all my drills bigger than 1mm fit. The large ones are a snug fit and the smaller ones a little loose, probably because with only a few tangential points touching there is little friction.


These two tests where done on HydraRaptor extruding 0.375mm filament from a 0.4mm nozzle. I printed this the test again on my Mendel with 0.6mm filament through a 0.5mm nozzle and the drills still fit, so it seems universal, at least amongst my machines. It would be interesting to see if others get the same result, so I have put the files on Thingiverse.

My goal is to work out how to print circular holes the correct size, but this seems like a good hack for OpenScad designs to allow holes to come out the right size, regardless of the printer or whether it compensates hole diameters. For example, one would expect circular holes to come out right on a professional printer, so if you have oversized circular holes in your model they will come out too big. However, if you use these low vertex count polygonal holes they should still come out the right size as one would also expect a professional printer to print polygons at least as accurately.