Thursday, 13 March 2008

The pros and cons of nozzles

HydraRaptor seems to be running reliably again, touch wood. I did have one scare when it started making noises like a machine gun when I had left it running unattended. It turned out that the shaft encoder code wheel on the extruder motor had fallen off. That caused the firmware to think it was far behind and so it applied maximum power in an attempt to catch up, which caused the GM3 gearmotor's torque liming clutch to slip. I added it to the list of sanity checks to put in my extruder firmware :-
  • If the shaft position gets more than, say, half a turn behind then give up.
  • If the thermistor resistance is too high then the thermistor is open circuit so turn the heater off.
  • If the thermistor resistance is too low then the thermistor is short circuit.
  • If the heater has been on for more than 5 seconds and the temperature has not risen then the heater is open circuit.
  • If the heater has been off for 5 seconds and the temperature has not dropped then panic, the transistor is short circuit.
All these checks are necessary for safe unattended operation in my opinion.

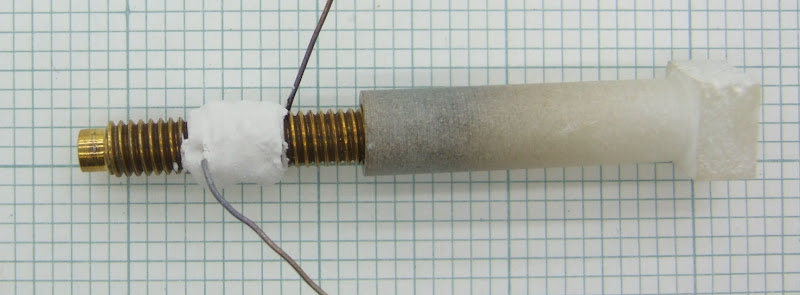
The solution to the code wheel problem was to extend the shaft of the GM3 with a piece of brass rod :-


I have managed to perform quite a lot of tests with HDPE and it is clear that the new acorn nut nozzle behaves quite differently to the previous one piece design.

The original nozzle looked like this and had a 0.5mm hole that was about 0.6mm deep: -


The new nozzle is made from an acorn nut turned to a point. I also has a 0.5mm hole, but it is tapered at about 45° so the the part of the hole that is 0.5mm diameter is very thin :-


The differences this seems to make are: -
  1. The die swell, i.e. the amount the filament expands from the hole diameter, is a little less.
  2. The amount of filament that extrudes after the motor is switched off has increased quite a lot. The excess is wiped from the nozzle, but by the time the head has moved from the brush back to the workpiece, a few more mm have leaked out making for a messy line start. I think this is because the shorter exit hole makes it easier for the plastic to escape.
  3. If I move the head quickly with the extruder off, then the filament snaps. It quite often leaves a blob that sticks to the workpiece. With the longer hole it stretched to a long thin string rather than snapping.
  4. I used to be able to lay down 0.5mm filament at 16mm/s by stretching, but now I can only do this reliably at 8mm/s as the filament has a tendency to snap. I think it is too easy to pull it from the new shaped hole.
When stretching the filament it has a greater tendency to cut corners. I think this is mainly due to not running the fan, but may also be because the nozzle is too pointy. A wider nose will help to push the corners down.

I can't run the fan because the heat loss from the bigger nozzle causes the heater to work harder, raising the temperature of the barrel above the point where the PTFE distorts. I need to insulate the nozzle so I will try making a new one similar to this one with a PTFE cover over it.

Here is about where I am at with extrusion quality: -


This is a rectangular block about the size of the extruder pump (60 x 20 x 15mm), with a 50% fill. I forgot to put a top surface on it but that is perfectly possible. It was extruded at 220°C (measured at the nozzle) with filament stretched to 0.75mm at 7mm/s. The layer height is 0.6mm and the pitch is 0.9mm. Some warping still evident but it has come a long way from my first attempts.

Saturday, 8 March 2008

Back up and running?

I rebuilt my extruder again and this time it lasted long enough to complete a test object so hopefully I can finish my research into HDPE FDM before moving on to PCL and ABS.

I replaced the 12mm diameter PTFE barrel with the recommended 16mm. Rather than make a new clamp I turned down the top end to 12mm.


I also replaced the woven insulation I was using with PTFE insulation. This is good for 250°C, which is fine for the thermistor but still a bit low for the heater. With this heater I brought out the nichrome tails which probably get hotter than the covered part of the winding. I think I prefer the way I have made my other heaters, which is to put the connections to the copper wires under the heater insulation. That way the copper wires never get any hotter than the body of the heater.

I put a pipe clip round the end of the PTFE to compress it against the screw thread. In an attempt to find out why my previous PTFE barrel deformed so much I made some temperature measurements with a different thermocouple to the one I used before, just in case it was faulty.

These are the temperatures I get with my software set to 200°C :-


The control of the nozzle temperature is very good, +/- 1°C. The other measurements show just how good an insulator PTFE is compared to the soapstone I mentioned in my previous article.

I think my problems stem from the fact that the heater barrel is quite a bit hotter than the nozzle. With the fan on, cooling the nozzle, the temperature difference will be even higher. It must have reached the point where PTFE starts to melt. I will try extruding without the fan from now on as I think that is what causes the PTFE and J-B Weld to give up. I might need inter layer pauses.

Compared to my first attempt at the extruder I have made the following improvements :-
  • The steel cable for the flexible drive is now the recommended 3mm rather than 2.5mm.
  • The drive screw has been replaced with one that has correctly centered bearing lands. This completely fixes the modulated filament I was getting before.
  • The springs are much stronger which means I don't need to tighten them as far, making assembly quicker.
  • The lock nuts on the studding have been replaced with plates which also make assembly and disassembly easier.
  • The PTFE barrel is now the recommended 16mm rather than 12mm.
  • The PTFE barrel is pinned into the clamp rather than relying on friction alone.
  • The heater barrel is held into the PTFE with a pipe clip.
  • The nozzle is now removable and has a shallower and tapered exit hole.
  • The thermistor is closer to the heater so my on off control cycles much faster and keeps within +/- 1°C compared to +/-3°C with my one piece nozzle.


So far I am finding that without the fan I need to extrude slower to get the same results I was getting before.

Cerastil and soap stone

As a bit of light relief from continually repairing my extruder I decided to have a play with the Cerastil H-115 high temperature cement that I have bought.


The minimum quantity that I could buy was 1Kg, which cost aver £100 including shipping and VAT. You only need a couple of grams to make an extruder heater so it is actually cheaper than things like J-B Weld.

It is labeled as a hazardous substance and comes with a material safety data sheet which says it can't be disposed of in domestic waste and must not enter the sewage system. The hazardous components are identified as potassium silicate and sodium fluorosilicate. When I looked them up on the web I found that the former is added to growing medium and in cosmetics and the latter is one of the chemicals added to water for fluoridation. So they don't seem very hazardous but I suppose it's a matter of concentration.

I am assuming that once it has been cured, by the addition of a little water, that it is then no more hazardous that a ceramic potted resistor like this :-


We are no longer allowed to put electronics in domestic waste in the UK but you can just take it to the local tip.

I masked a brass heater barrel and applied a thin layer.


I left it to set for 24 hours and then wound it with two strands of 0.1mm nichrome twisted together. That gives me just 110mm for 8Ω, to keep the heater short. I attached copper wires with high temperature solder and then put a thicker layer of Cerastil over the top. I then left it another 24 hours to cure.


It looks a bit lumpy because of the solder joints underneath.

I mounted it in an insulator that I turned from soapstone and ran it for a few hours at ~290°C.


The bottom of the soapstone barrel got to about 120°C. After the test the Cerastil looked exactly the same, unlike J-B Weld which goes very dark. The soapstone did discolour though at the hot end.


So where has this experiment taken me on my quest to make a durable extruder that covers the full range of thermoplastics? Well I will definitely be using Cerastil from now on as it seems the perfect adhesive for potting heaters, not surprisingly as that is what it is designed for. It is a high temperature adhesive that is a good electrical insulator and a good thermal conductor. I am not sure I can recommend it for the RepRap project though because it is very specialist and not widely available

I am also not sure about the soapstone. I was surprised it changed colour but I don't know if it matters or not. It looks like it would need to be twice as long, or have a heatsink at the cool end. I am also a bit worried about its strength.