Khiraly asked me for a walk through of the lathe accessories I mentioned
before, so here goes. I am no expert on lathes, I am learning as I go along. In fact, I learnt quite a lot writing this!
Cutting tools
This is an
11 piece tungsten carbide turning tool set. I had some trouble finding out exactly what each tool is intended for. This diagram, from the
McMaster-Carr catalogue, gives a good idea but doesn't exactly match the shapes.

Today I noticed that each tools is stamped with a DIN standard. Googling those mainly came up with German and Scandinavian adverts for the tools, some of them charging $99 for one tool! Eventually I found a German
site selling DIN standards. Putting in each number gives the title of the standard, which is the description of the tool.
So from left to right we have: -
- DIN 4974 R Internal side turning tools for corner work with carbide tips.
- DIN 4973 R Boring tools with carbide tips.
- DIN 4980 L Offset side turning tools with carbide tips.
- DIN 4980 R As above but right handed.
- DIN 4978 R Offset turning tools for corner work with carbide tips.
- DIN 4971 R Straight turning tools with carbide tips.
- DIN 4972 R Bent turning tools with carbide tips.
- DIN 4977 R Offset face turning tools with carbide tips.
- DIN 4981 R Parting-off tools with carbide tips.
- DIN 4976 Wide face square nose tools with carbide tips.
- DIN 4975 Pointed straight turning tools with carbide tips.
1 & 2 are mounted parallel to the lathe axis and are used to bore out the inside of the workpiece. Each cut would be along the axis and successive cuts would move outwards.
8 would also be mounted parallel to the axis, but with the cut going across the face of the workpiece.
9 is mounted perpendicular to the axis and is driven into the work to cut it off from the stock. I hadn't realised it was a parting off tool, I have happily been using it to turn bearing lands with straight sides. I bought a thinner
parting off blade, which wastes less material.

All the other tools are for mounting roughly at right angles to the axis and cutting along the outside of the workpiece.
11 has a 60° point for cutting external threads. I bought a set of gearwheels for cutting metric threads. These alter the speed of the lathe's auto feed to match the thread pitch. The procedure looks a bit complicated though, so I have stuck to using a die so far. It would be nice to be able to make large pitch
ACME lead screws but that seems even more
complicated.
I have had titanium nitride indexable tools recommended to me for their very long life. They have a three pointed replaceable tip. Each time a tip wears out you can rotate it until they are used up, at which point you replace it. They are quite expensive but replacement tips are not too bad.
You can also buy blank steel tools and grind them to whatever shape you want yourself.
Tools are mounted in the tool post and held down with machine screws :-

The tip of the tool must be at the same height as the centre of work. This is most easily done by aligning it against the tailstock centre. Small differences can be compensated for with the rocker under the tool by tilting it slightly. Large differences would result in the tool at the wrong angle so the other side of the post is used with a shim. The tool should be gripped as close to the working end as possible to prevent chatter.
Compound SlideThe lathe comes with a cross slide that allows you to move the tool across the workpiece and the feed screw allows motion along the axis of the lathe. To be able to cut a taper, and for cutting threads, you need to be able to move at an angle to the lathe's axis. The
compound slide replaces the tool post and adds another axis of movement at any desired angle.

The next model up lathe, the
CL300M, includes a compound slide, so if you take that into account the price difference is not that much. A lathe without one is quite limited, IMHO.
Drill ViceI got a tiny
quick release drill vice that fits on the cross slide to hold work for drilling or milling. Quick refers to the fact that rather than screw the vice all the way to open it, you lift a ratchet and drop it in the nearest slot for the width you want. Then you use the screw to tighten it no more than a quarter of its maximum travel.

This highlights the main compromise having the lathe, mill, drill combo. The cross slide is wider than normal for a lathe, which limits how close the tailstock can get to the chuck, but small for a milling table or a drill table. Also the height of the cross slide means that the tallest thing you can drill is not as much as you would expect from a pillar drill. If I get desperate I could remove the tailstock and cross slide, move the saddle out of the way and put a board on top of the lathe bed to drill a large object.
Tailstock ChuckThis is just a drill chuck with an MT1
Morse taper to fit into the tailstock quill. It allows you to drill into the center of the work piece. You might think holding the drill stationary and spinning the work is the same as spinning the drill and holding the work. It isn't, the former ensures the hole is exactly down the centre of the workpiece.

The chuck is exactly the same as the one the comes with the milling machine, but annoyingly that and the headstock have MT2 tapers but the tailstock is only MT1. If the tailstock was MT2 it could have shared the chucks with the milling machine, and also many other tailstock attachments, like boring heads and tap holders that only seem to go down to MT2.
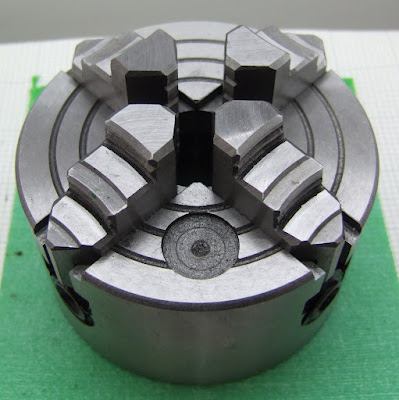
Four Jaw ChuckThe lathe comes with a three jaw self-centring chuck. The jaws all move together to hold a round or hexagonal workpiece centrally (within the accuracy of the chuck). To hold a square or octagonal shaped object you need a
four jaw chuck. These usually have jaws that move independently allowing / requiring objects to be centred manually. That also allows rectangular objects to be centred and you can also mount things deliberately off centre.

Potentially you can centre round things more accurately than you can with a three jaw chuck but it takes more time and skill.
Large, and or completely irregular shaped things can be held using a
faceplate and bolts or clamps.
Milling ChuckThe drill comes with a normal three jaw drill chuck.

A collet chuck provides better centring and grip for milling. Expensive, but the sizes match a set of end mills I already had.

This also fits the headstock, so another way you can mill and drill on a lathe is by using a
vertical slide.
WigglerThis is a special chuck and a set of probes that are used for lining up the drill / mill with centre marks and edges of the workpiece.

The special chuck forms a ball and socket joint with the probe so it can swing. When you spin it in the drill chuck it rotates in a circle, but by pressing on the edge you can persuade it into a mode where it spins dead centre to axis of rotation. You use the point to line up on centre punched holes and the ball and cylinder for finding edges. The bent one is used with a dial indicator but I don't understand how or why.
Instructions for using one are
here. The balls are imperial sizes, which is a pain if you are working in metric units. I don't know if you can get metric ones.
Die HolderThis allows tapping an external thread by turning the workpiece in the chuck and holding the die with the tailstock.

The bar goes in the tailstock. The tube slides over it and can be rotated part of a turn with the handle. Different size dies can be used in each end of the holder and the two adaptors allow for two larger sizes.
I could not find one to fit an MT1 tailstock, so I had to get an MT2 one plus an MT1 to MT2
adaptor.

This is far from ideal because it takes up so much of the distance between centres. I ground off the tang at the end of the taper because there is nothing to engage it on my lathe. That gives me about another 10mm. I will probably bore out the end of the die holder's bar so that it will accept an M5 bar inside it. That will allow longer threads to be tapped without weakening it too much.
One other problem with the die holder was that the set screws in it do not have pointed ends. When using split dies the middle screw should have a cone shaped point so that tightening it forces the split open, allowing an oversize thread to be cut. Tightening the outer two makes an undersized thread. When tapping something hard like stainless steel you need to start oversized and then work down.
I solved the problem by turning a point on an M5 setscrew to replace the middle screw.
I should really have made one of these, I think, rather than buying this one that is too big. It should be fairly straightforward to make on a lathe. I don't fancy turning an accurate MT1 taper but you can buy Morse tapers with a soft blank on the end for machining to a custom use.
Centres
The MT1 tailstock centre of the right came with the lathe and is known as a "dead centre" because it does not rotate. The one in the centre is a "live centre" because it has a bearing, which allows it to rotate with the work, reducing the friction. There is also a variant called a "half dead centre" which is a dead centre with half the cone cut away to allow a facing tool to get in.
I also got an
MT2 dead centre to fit the headstock or my MT2 adapter.
Some good reference material: -
www.americanmachinetools.com/how_to_use_a_lathemyweb.tiscali.co.uk/silkstone/minilathe/minilathe01


 (2arctan((1+√5)/2)) minus 90°. That makes the base of the object and the first line of vertices above it.


